 |
| The dome takes shape. |
This week, I have been piecing together the various elements that will form the glass dome over the engine room.
 |
| Dome end-pieces are cut to match and detailing begins. |
 |
| 4mm wide strips are laid over 6mm wide strips to create a greater sense of bulk for the outward-facing piece. |
As depicted in my last post, the dome is a fairly complex construction. Being largely clear 'glass', it will be necessary to build, detail and paint the inner iron structure, over which will be laid acetate sheet, and then finish with the outer structure.
 |
| Rows of window frames are measured and cut for the sloping outer edges of the roof. These will line up with the iron work panels of the engine room walls. |
Two identical decorative dome ends support huge girders via decorative corner brackets, all of which are detailed with overlapping iron plates, artistically placed loopholes and many, many rivets. The elaborate design and ostentatious sense of scale are in keeping (I hope) with the designs of great Victorian engineers such as Joseph Paxton. Bigger is better and expense is not a concern...
 |
| Outer (top) and Inner (bottom) window frames are constructed, prior to rivetting and painting. |
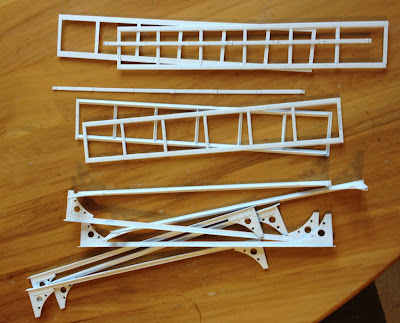
The first step of this part of the project is therefore to complete the inner shell. Both ends of the dome must be finished inside and out, then the girders and the inner pieces of the sloping window frames must be finished, painted and glued in place. Following this, I will be able to glue down the acetate sheets for glass and begin work on the outer detailing.
 |
| The various components: girders, dome ends and window frames. At this stage, I haven't constructed the corner brackets for the girders. |
Of course, everything has to fit very well indeed, as the roof is largely transparent and mistakes will be obvious.
 |
| Fourteen corner brackets are designed and hole-punched for the seven huge girders. |
 |
| The brackets, detailed, are a great fit - here, they haven't been glued to the dome end at all - just slotted into place. |
I require seven massive girders (and therefore fourteen brackets) to attach to the seven radial lines of the dome ends. Of course, if this was a real construction, there would possibly be more iron work -but I don't want to spoil the look of the model, or compromise the transparency of the roof. The engine room should be visible, after all!
 |
| Ends and girders, slotted together. |
 |
| Roof components ready for rivetting! |
By constructing all the main pieces in this manner, I now have a 'kit' and can easily see how things are going to work. A massive rivetting session will now follow, before painting the pieces and fixing them in place.
 |
| My rivet kit - pointy stick (for picking up and applying rivets) glue, plastic rod, sharp knife. I usualy cut between fifty and a hundred rivets at a time... |
...and so begins the rivetting...
 |
| A girder is detailed. At 51 rivets per side, and a total of seven girders, these alone will account for 714 rivets! |
 |
| Outer (top) and Inner (bottom) dome ends are detailed. Together, these account for 639 rivets. These pieces can now be painted before sandwiching a sheet of acetate. |
Which brings me to this week's Rivet Count...
So far, haing applied rivets to the new dome end and one half of a girder, I have added 690 to last week's 7,631, bringing the total so far to:
8,321 !
What is more, each girder will have 102 rivets, so by my next post, I shall pass 9,000. This project is starting to get silly...
I still have a lot more detail to add to the engine room, but I am starting to think about the mid-section of Lord Smdgington Smythely-Smythe's Hydraulically-Motorvated Sextupedal Land-traversing Vacational Domicile... the Mansion!
So now, on to a bit of smaller-scale silliness.
I unearthed these two conversions the other day. Some time ago, I had been working on an army of Rackham Miniatures' wonderful Japanese-style goblins. (What a shame those things aren't produced anymore!)
 |
| Goblin heads and reptile hands and swords (from Reaper Miniatures' Reptus warriors) are added to a wire frame before sculpting ethereal bodies from greenstuff. |
The goblin samuraii and ninjas are all packed away in a box somewhere, but having had two heads left over, I had sculpted these two to serve as Gaki (Japanese ghosts)... Anyway, in keeping with Steampunk and Lost Continents and all that stuff, I decided to resurrect them (sorry!) as a pair of Genies.
 |
| Ptonik is undercoated with white, then washed with brown ink. Following this, he is highlighted white and washed with thin blue ink. |
And so, may I present the legendary scourges of the lost city of Ah-Pul Sch'Napps - Djinn and Ptonik!
 |
| Highlighted again with a pale flesh colour. |
 |
| Shading added with more blue ink. Hair is coloured with a coat of rust ink. |
These have been quickly coloured with inks - as with most of my miniatures.
 |
| Djinn. What a pretty boy! |
I'd like to come up with a witch doctor for the Wutha-F'Kahwi tribe to summon these terrors. I have a few things in mind.
 |
| A somewhat startled adventurer may soon wish he'd stayed in bed today... |
These didn't take long to do but I think they look great!
Now, on with the rivetting... More soon!
All the Best!


0 Yorumlar